Wednesday, 8 August 2012

How To get RowIndex of Asp.Net GridView in the RowCommand Event


As we know that if we add any button control or image button control or link button within the GridView and click to generate postback event then GridView RowCommand Event will fire. But the problem is from this RowCommand method we did not easily get the cliclked or selected GridView row index number. To get the RowIndex of Asp.Net GridView in the RowCommand Event we have two options.

1. Using CommandSource object
2. Using CommandArgument property

Ok our target is to add an action button within GridView rows & get the RowIndex number from RowCommand Method like below:
GridView RowCommand to get RowIndex
Using CommandSource object:
To do that first add a GridView with a LinkButton in a template field like below:


<asp:GridView ID="GridView1" runat="server" Width="800px" AutoGenerateColumns="False" OnRowCommand="GridView1_RowCommand" >
         <HeaderStyle BackColor="Red" Font-Bold="true" ForeColor="White" />
         <RowStyle BackColor="LightGray" />
         <AlternatingRowStyle BackColor="LightGray" />
         <Columns>
             <asp:BoundField DataField="Brand Name" HeaderText="Brand Name" />
             <asp:BoundField DataField="Category Name" HeaderText="Category Name" />
             <asp:BoundField DataField="Product Name" HeaderText="Product Name" />

                <asp:TemplateField HeaderText="Submit" ItemStyle-HorizontalAlign="Center"> 
                <ItemTemplate> 
                <asp:LinkButton ID="lnkSubmit" runat="server" CommandName="Submit" Text="Action" ></asp:LinkButton> 
                </ItemTemplate> 
                <EditItemTemplate> 
                </EditItemTemplate> 
                </asp:TemplateField>             

         </Columns>
        </asp:GridView>
        

        <hr />
<asp:Label runat="server" ID="lblRowIndex" Font-Bold="True" Font-Size="Larger"></asp:Label>

Now go to the design mode. Right click on GridView to get property window. From event list select RowCommand event. Double click to write the method code like below:


protected void GridView1_RowCommand(object sender, GridViewCommandEventArgs e)
    {
        if (e.CommandName.Equals("Submit"))
        {
            GridViewRow oItem = (GridViewRow)((LinkButton)e.CommandSource).NamingContainer;
            int RowIndex = oItem.RowIndex;
            lblRowIndex.Text = "Row Index = "+RowIndex.ToString();
        }
    }
Now run the page & click on any one of the Action linkbutton. The label shows the RowIndex number of your clicked Action button.

VS2010 : Unexpected error writing metadata to file '.exe' | 'Not enough storage is available to complete this operation.'


You might get an error "Unexpected error writing metadata to file '.exe' - 'Not enough storage is available to complete this operation." when you build with Visual Studio 2010.

Well ,sometime back we had a migration to using Visual Studio Team system from using Source depot. Incidently this was the I was building my app after the migration and setup of VSTS. When trying build the app, I was getting the above error which was delaying my work for almost an entire day. I had sufficient hard disc and memory space - as opposed to what the message said. "Binging" didn't help much.. several sites suggested to re-install VS 2010. However, I was little skeptical in doing a re-install as I was almost for sure knew there was nothing wrong with my VS installation.
I randomly tried several options -luckily one of that fixed the issue. So for anyone else having the same issue - here are the steps - which you may want to try, if your Source control uses VSTS:
 
1. Check the path that contains your Project.
2. In Team explorer, click Source control.
3. In Source control explorer, right click on the folder of your project that gives the above error and click "Remove mapping".
 

4. This removes any connection of that folder of your project with VSTS. This might take a few minutes if your project is large.
5. Create a new folder and map your project to the new folder by taking the latest from TFS.
6. Build your project.
 
This should solve the above issue.

Export to Excel/Word from Nested GridViews

Exporting a GridView to an Excel/Word is one common requirement in ASP.NET applications. In case of simple GridViews this is a pretty easy and the code for the same can be found in my earlier article.

In case of Nested GridViews, when trying to export to Word/Excel, the output comes would always be rendered inverted in Word/Excel.

In this scenario, let us see how we can export the entire Nested GridView.

The first step is to insert a <div > that embeds the entire Nested GridView.
For Ex :


<div id="divNestedGrid" runat="server">
<asp:GridView id=.. >
...
<asp:GridView .... />
---
</asp:GridView>
</asp:GridView>
</div>

Next step is add a hidden variable in the same aspx form.

<input type="hidden" id="hdnInnerHtml" value="" runat="server" />

Now add a javascript function that in the aspx that fills the hidden variable with the inner html of the div.


function getInnerHtml()
{
var element = document.getElementById("divpreview");
var store = document.getElementById("hdnInnerHtml");
//add the css styles you have used inside the nested GridView
var css = "
Now in the Code Behind, first add the javascript function to be triggered on the click on the Export button.


btnExport.Attributes.Add("OnClick", "getInnerHtml();");

Finally, write the following code in the Export Button click event, to Export to Word:


string html = hdnInnerHtml.Value;
Response.Cache.SetExpires(DateTime.Now.AddSeconds(1));
Response.Clear();
Response.AppendHeader("content-disposition", "attachment;filename=FileName.doc");
Response.Charset = "";
Response.Cache.SetCacheability(HttpCacheability.NoCache);
Response.ContentType = "application/vnd.ms-word";
this.EnableViewState = false;
Response.Write("\r\n");
Response.Write(html);
Response.End();

In case of Exporting to Excel, you can change the code as follows:


string html = hdnInnerHtml.Value;
Response.Cache.SetExpires(DateTime.Now.AddSeconds(1));
Response.Clear();
Response.AppendHeader("content-disposition", "attachment;filename=FileName.xls");
Response.Charset = "";
Response.Cache.SetCacheability(HttpCacheability.NoCache);
Response.ContentType = "application/vnd.ms-excel";
this.EnableViewState = false;
Response.Write("\r\n");
Response.Write(html);
Response.End();

In this article we discussed different ways of Exporting Data to Excel and Word when dealing with Nested Grid Views.

Make "Export to Excel" always open excel in a separate Window

Export to Excel in ASP.NET is a very common feature, which I'm sure everyone who has worked in ASP.NET would have had the chance to implement. 

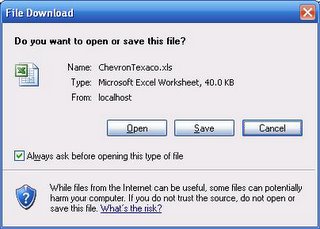
Whenever we choose the Export to Excel option from our Application, a dialog box pops us with the option to Open or to Save, as shown below:


By chance if the user checks off the option "Always ask before opening this type of file", from next time the user will not be able to see the dialog box. Instead, the excel file opens up in the same window.

To set back this option, the following steps can be followed:

1. Go to Windows Explorer.
2. On the Tools menu, click Folder Options, and then click on the File Types tab.
3. From the Registered file types list box, select the XLS extension, and then click Advanced.
4. In the Edit File Type dialog box, set the Confirm open after downloadto selected.
5. Make sure the Browse in same window option is not selected, and then click OK.

The above steps will make sure that we get the dialog box as shown above. However, since this is an option set at the client computer, these steps cannot be mandated to be followed in every computer that browses the application.

So, from the code level, we must make sure that the excel file is opened in a separate window. One possible option for this is to Save the file to the web server, and then open the file in a separate window.

The code for this is given below:

private void ExportToExcel(DataGrid dgExport)
{
try
{
string strFileName = String.Empty, strFilePath= String.Empty;
strFilePath = Server.MapPath(@"../Excel/") + "ExcelFileName" + ".xls";
if (File.Exists(strFilePath))
{
File.Delete(strFilePath);
}
System.IO.StringWriter oStringWriter =new StringWriter();
System.Web.UI.HtmlTextWriter oHtmlTextWriter = new HtmlTextWriter(oStringWriter);
StreamWriter objStreamWriter;
string strStyle =@" 
";
objStreamWriter = File.AppendText(strFilePath);
dgExport.RenderControl(oHtmlTextWriter);
objStreamWriter.WriteLine(strStyle);
objStreamWriter.WriteLine(oStringWriter.ToString());
objStreamWriter.Close();
string strScript = "";
if(!Page.IsStartupScriptRegistered("clientScript"))
{
Page.RegisterStartupScript("clientScript", strScript);
}
}
catch(Exception)
{
//Handle Exception
}
}
In the above method, the file is saved to the Web Server inside the folder "Excel". Of course, this folder must have write permissions for the user. But it will definitely ensure that the excel file is opened in a new window in the client computer.

JS : Reload Parent Page After Child Popup Close.

I've Answered this Question many Times

This is your Simple Popup Page on any Button click event.


string popup = "";
ScriptManager.RegisterClientScriptBlock(this.Page, this.GetType(), "PopupScript", popup, false);

And This is your Popup.aspx and Close Button Event
protected void CloseButton_Click(object sender, EventArgs e)
 {
        
   CloseButton.Attributes.Add("onclick", "return windowclose();");
   ClientScript.RegisterStartupScript(GetType(), "CloseScript", "window.opener.location.reload(); window.close();", true);
  }

Good Luck`

Binding XML Data to TreeView with Checked state of Checkboxes

Often we come across data that is hierarchial in nature.

Let us take a real world example of a profile page of a person that takes the interests of a person. The Interest categories are categorized in a hierarchial structure, with Categories such as Books, Entertainment, Sports, etc. There will be sub categories, for example, for Books category there might be sub categories as Religion, Literature, etc. and Region might have sub sub categories such as Christianity, Hinduism, etc.

The best way such type of Hierarchial data can be shown is through a Treeview control. To bind the entire set of categories, sub categories, sub sub categories, the best way is to bind the TreeView with XML.

In ASP.NET 2.0 we have an XmlDataSource control that serves exactly this purpose. The XMLDataSource can take up any static XML file that contains XML data.

Ex:

<asp:XmlDataSource ID="CategoriesXmlDataSource" runat="server" DataFile="MyXml.xml"></asp:XmlDataSource>

The XmlDataSource also has a XPath property that is used to filter data in the xml.In case the data to be bound comes from database, we can use the Data property of XmlDataSource control to directly bind the xml string from database to the treeview. From the example we have taken on the Categories and Sub categories, we intend to show check boxes on the treeview, and also want the check boxes to be in checked state according to how the profile has been updated for the person. Let us now check on how we can achieve this.

The first step is to write a proper query that gives an xml document as output. This Xml document must basically contain the entire hierarchial structure that must be displayed as a treeview.If SQL Server is your database, you can easily achieve this by using joins and using the "for xml auto" clause in your query.

Now if you wish to bind the checked state of check boxes as well, using the data from database, you must also bring this checked state as another attribute of every node.

Ex: The xml from database must be something like:


<Categories>
<Category ID="1" Name="Books" checked="false">
<SubCategory Id="2" Name="Religon" checked="false">
<SubSubCategory Id="Hinduism" checked="true" />
<SubSubCategory Id="Christianity" checked="false" />
<SubSubCategory Id="Islam" checked="true" />
</SubCategory>
</Category>
</Categories>
The next step is to make this xml from database to be the datasource for XmlDatasource control. To do this, add this declaration in your aspx page:


<asp:XmlDataSource ID="XmlDataSource1" runat="server" XPath="/Categories/*"></asp:XmlDataSource>


The XPath expression filtes out the top root node and displays the rest of the nodes.
Now in the code behind page add this code in Page_load event:


XmlDataSource1.Data = GetXmlData();

The GetXmlData method retuns the entire xml structure as shown above from database.

The final step is to bind the Treeview control with this XmlDataSource. This is done using the <DataBindings> property of the ASP.NET Treeview.

To the <DataBindings> of the Treeview we add the TreeNodeBinding, for each of the different levels in the TreeView.

For this, add the following declaration in your aspx page:


<asp:TreeView runat="server" ID="tvwCategories" ExpandDepth=1 OnTreeNodeDataBound="tvwCategories_TreeNodeDataBound" ShowCheckBoxes="All" >
<DataBindings>
<asp:TreeNodeBinding DataMember="Country" SelectAction=None PopulateOnDemand=true TargetField="checked" ValueField="ID" extField="Name"></asp:TreeNodeBinding>
<asp:TreeNodeBinding DataMember="Geography" PopulateOnDemand=true SelectAction=None TargetField="checked" ValueField="ID" TextField="Name"></asp:TreeNodeBinding>
<asp:TreeNodeBinding DataMember="Region" TargetField="checked" SelectAction=None PopulateOnDemand=true ValueField="ID" TextField="Name"></asp:TreeNodeBinding>
<asp:TreeNodeBinding DataMember="State" TargetField="checked" SelectAction=None PopulateOnDemand=true ValueField="ID" TextField="Name"></asp:TreeNodeBinding> </DataBindings>
</asp:TreeView>


The DataMember property in TreeNodeBinding is used to specify the different XML elements that will be bound to the TreeView.

The ValueField and TextField properties correspond to the Xml attributes that will assign the Text and Value fields to each node in the TreeView.

The TargetField is here used to set the Checked state of the nodes from the corresponding Xml attribute (i.e. checked). (The TargetField in actual usage is for assigning the "target" html attribute, so that any link from the TreeView will open in the target window accordingly.)

The SelectAction=None specifies that the nodes in the TreeView do not have links or any other click action.

Note the method that is called in OnTreeNodeDataBound event. This method will basically set the checked state of the checkboxes.

The following is the code for the event that has to be added in the codebehind page:


protected void tvwCategories_TreeNodeDataBound(object sender, TreeNodeEventArgs e)
{
if (e.Node.Target == Convert.ToString("true"))
{
e.Node.Checked = true;
}
else
{
e.Node.Checked = false;
}
}
The page is now ready to be compiled and browsed. Of course, there are several ways to set the checked state of checkboxes in treeviews. However, using the above method we avoid the unnecessary for/foreach loops that may have to be used for doing the same.

Thanks.

How to hide submit button and Show ID.

I've answered : http://forums.asp.net/t/1799649.aspx/1?how+to+hide+submit+button+and+show+Id+instead+of+that

Question : once click on submit button page have to redirect to page 2.//which i already did
and when user click on back button, that submit button have to hidden and there user can see the Id (number with hyperlink) //how to do this??????
aftre click on that Id user can see again page 2 with that id on querystring.
Answer:
For Example:
Concentrate on the scenario..
1st Page: you have 1Label visible false, 1Submitbutton, 1Hyperlink visible false.
and 2nd page (what ever u wanna put)
on 1stPage. Submitbutton click event
write code :
Session["submit"] = "submit";
Session.Timeout = 5; // 5min.
Response.Redirect("2ndPage.aspx");
its simple u have Redirected to another Page with session.
Now,
on the PAGELoad of 1stPage.aspx.cs
write this code


Respone.Redirect("1stPage.aspx");
if (Session["submit"] != null)
        {
            Label.Text = "ID"; // Bind This ID if you want.
            Label.visible = true;
            HyperLink.visible = true;  // if User has Clicked on SubmitButton so he will get the Session of Submit if there will be Session like "submit" so User will View these Controlls
            Bind this Hyperlink.
        }
        else
        {
            Hyperlink.visible = false;
            Label.visible = false; // its means that if user will not click Submitbutton he will not see these Controls
            
        }
Good Luck`

Twitter Delicious Facebook Digg Stumbleupon Favorites More